Having had to set up Git in Jenkins running on Windows recently, I thought I’d document what I did to get it to work.
Firstly, the software involved:
- Windows 10
- Jenkins (currently it is version 1.651)
- Git (Git-2.7.2-64-bit.exe from https://git-scm.com/downloads). Note that this Git install comes with ssh (and some other linux utilities).
Assumptions
My requirements for Git are to pull a remote repository so Jenkins can perform a build, run tests, then deploy the artifacts somewhere. Thus in my case I only need read-only access to the remote repository.
So:
- You must have or know how to generate an SSH key with no password. Your remote repository must have been configured to use that key (e.g. Bitbucket - Use deployment keys). Note: Having no password definitely reduces the security of the key, so make sure your build server is secured (e.g. good password), and ideally that key only has readonly access to the remote repository.
- You are running Windows 10. Adjust the steps as necessary for other Windows versions.
Aside - Why SSH?
We use BitBucket and when configuring the Deployment Keys, you can only use SSH keys.
Step 1 - Install Jenkins
Pretty easy. Download the Jenkins Windows Installer from https://jenkins-ci.org (direct link - http://mirrors.jenkins-ci.org/windows/latest).
Run the installer.
Tip - I normally install Jenkins on its own drive as depending on how many builds you keep, jobs you have, it can consume quite a bit of space.
Step 2 - Run Jenkins as User
As Git will be using SSH and thus will be looking for the .ssh folder we’re going to run Jenkins as its own User rather than as the default “Local System Account”. If you want or need to run as “Local System Account” stop now and follow the instructions at http://opensourcetester.co.uk/2013/06/28/jenkins-windows-ssh/.
We first need to create a Windows User. I’m doing everything on a machine that is not connected to a domain. Adjust the steps necessary to create the user within a domain.
Create the User
Follow these steps to bypass all the
- Open up the Computer Management management console app (tip - search in Cortana for “Computer Management”):
- Go to “System Tools” -> “Local Users and Groups” -> “Users”:
- Select “Actions” main menu then “New User…”. The New User dialog should show. Enter in the details you want. Uncheck “User must change password at next login”, check “User cannot change password”, and “Password never expires”:
- Select “Create” to create the user.
Configure User to Run Jenkins Service
We now need to configure the user so that they can run the Jenkins Windows Service. Normal users by default cannot.
- Open up the “Local Security Policy” management console app (tip - search in Cortana for “Local Security”):
- Go to “Local Policies” -> “User Rights Assignment”:
- Find the Policy “Log on as a service”, then double-click on it. Add the user you created above. You should end up with something like:
- Now the Jenkins service needs to be configured to run as this new user, so to do so, go to the Services management console app (tip - search in Cortana for “Services”).
- Find the “Jenkins” service and stop the service. Now double-click on it. Under the “Log On” tab, select “This account:” option, enter in the newly created user and its password and select “OK”:
- Now re-start the “Jenkins” service. Open up a local web-browser and browse to “http://localhost:8080” to make sure that Jenkins is running. If not, there may be a configuration issue so re-check that everything was done correctly as above.
Step 2 - Install Git
Run the Git installer downloaded from https://git-scm.com. I chose the following options during the installation. Note that it is important that you select “Git and optional tools” otherwise pulling git repositories using SSH is not going to work too well as git will not be able to find ssh.
Tip - I usually install Git at D:\apps\git so that there is no likelyhood of spaces causing issues.
- As this is a build server, we don’t need any integration with Explorer.
- When it prompts for how to use git from the command line, make sure you choose the Git with optional tools as this will add the ssh utility to the %PATH% environment variable.
- Click next a couple more times and git should be installed (the other options are not relevant to this post).
Step 2 - Configure SSH
I’m using SSH to connect to the remote Git repository. This is really where most of the complexity is with this set up.
Again, just to re-iterate, you need to have an passwordless SSH key generated already and have configured your remote repository to accept that key.
Just to describe what is going to happen - When Jenkins polls the remote repository, it is going to run “git.exe” as the User that the Jenkins service runs as. When Git connects to the remote repository, it is going to use ssh.exe which in turn is going to look for the SSH Private Key at ~/.ssh/id_rsa. Note that ~/ maps to %HOME% which on Windows normally doesn’t exist, but we’ll map it to %userprofile% (e.g. C:\Users\<username>\).
I’m doing all of the set up while still logged in as an admin user. You could perform the same configuration by logging in as the Jenkins Windows User.
Configure .ssh folder
We’ll firstly set up the .ssh folder and known_hosts for the Jenkins Windows user.
- Open up Command Prompt. Then type in the following replacing
<username>with the Jenkins Windows User username (e.g. jenkins)runas /profile /user:<username> cmdIt will prompt you for the password of the user and if successful, open up a new Command Prompt window. - In the new Command Prompt Window, go to the user’s profile:
cd %HOME%And you should be taken to the user’s home directory (E.g. C:\Users\jenkins). - Now create the
.sshdirectory in the user’s home directory:mkdir .ssh - Copy your id_rsa private key file into the Jenkins user’s .ssh folder (note: you’ll have to manually browse to the directory in Windows Explorer as
explorer .will not work in the Jenkins user command prompt). - If you already have the known_hosts file for the remote repository readily available, copy it under .ssh now.
Close the jenkins user Command Prompt for now.
Configure HOME Environment Variable for Jenkins Windows User
We need to set the HOME environment variable for the jenkins user, so to do so we’ll need to edit the Registry for that user.
- We first need to find the SID of the Jenkins Windows User. Open up Command Prompt and type in the following, replacing
<username>with the Jenkins Windows User username:wmic useraccount where name='<username>' get sidYou should then see something like:C:\Users\admin>wmic useraccount where name='jenkins' get sid SID S-1-5-21-2036844044-1338580185-3091361466-1002 - Now open up regedit and go to
HKEY_USERSand find the folder for the SID above. Then go to Environment. - Now create an “Expandable String Value” (REG_EXPAND_SZ) with the Name of “HOME” and the value of ‘USERPROFLIE%’ (you have to modify it to set the value).
- Lastly restart the Jenkins Service so that it get the new Environment Variable.
Test that Git can connect
Now we’ll test that Git can connect to the remote repository. Going back the Jenkins user command prompt (e.g. runas /profile /user:<username> cmd), type in the following, replacing with the remote repository url.
git ls-remote <git_repo>
If you haven’t configured known_hosts, you will get prompted on the authenticity of the remote host. If ok, type in yes. This will populate the ~/.ssh/known_hosts file.
If everything is configured, you should see a list of the references in the remote repository (e.g. master, list of tags, etc.).
Step 3 - Configure Jenkins with Git
We need to install a plugin before being able to clone a repository from Jenkins.
To do so, open up Jenkins, go to “Manage Jenkins” then “Manage Plugins”. Select the Available tab, then search for Git plugin. You should find the following:

Select and install that. It will install Git client plugin as well which is a dependency.
Step 4 - Configure Jenkins Job
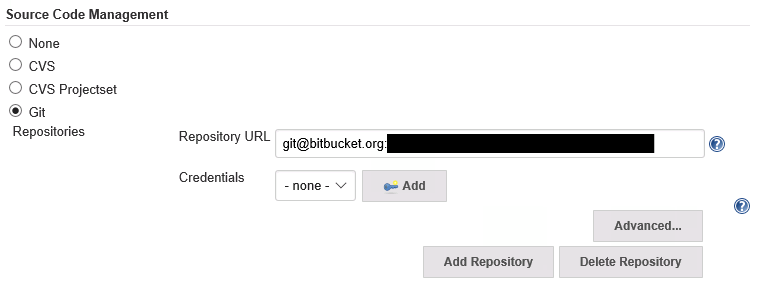
Finally, we need to configure a Jenkins Job to pull from the Git repository, so under Source Code Management set the Repository URL. For example:
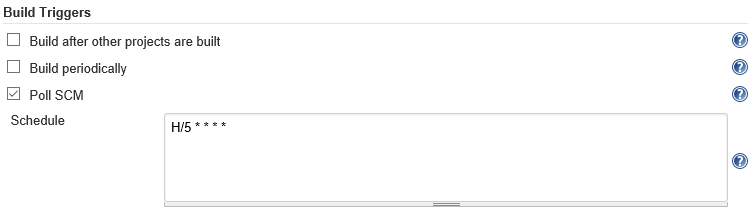
Then configure to Poll the remote repository (assuming you’re polling it):
And that should be it.